- English
- Français
This is an old revision of the document!
Table of Contents
Editing the Wiki page of your Property
When you become the happy owner of a Property (sometimes called a “Lot”), it is your job to write about it: giving it a nice name, describing it, adding images, etc.
This is accomplished by writing in the Wiki page that was automatically assigned to your Property. The Laelith interactive map will grab it, extract its text, images and metadata, and display all these elements in a nice way.
We won't go into the details of editing a Wiki page here, this topic is fully covered in the DokuWiki documentation. We'll focus instead on how the relationship works between your content and what shows up in the Map (or on your Profile).
Getting started: your Profile
You will see your Property in your Profile at https://id.laelith.com/profile :

- Clicking on the image will take you to the map and zoom on it, using its Cadastre ID (the identifier that looks like 1-2-3-4…).
- Clicking on the little book icon will take you to the Wiki page
Creating the Wiki page
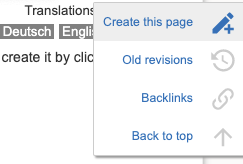
Click on the little book icon: this will take you to the Laelith Wiki at the url prepared for your Property. So you may wonder why it's telling you that the page does not exist yet?

You must create the page yourself. Simply click on the pen button on the right side and confirm “Create this page”:
Hurray, you can now type your text, preview it and save the page!
Naming your Property
Give a title to your page using the H1 headline. The Map will use it to name your Property.
====== Harzak's Little House ======
Writing the summary paragraph
Go ahead and type a first paragraph of text. The Map will extract it from the page and display it first. Following paragraphs will be added to the “Learning More” section on the Map panel.
This little house on the Lakeshoe Terrace seems poor and quiet,
but don't be fooled! It is in fact the hideout place of Harzak the
Thief - a man of sinister reputation...
Seeing your changes on the Map
The Map will be updated every 5 minutes. So you may have to wait a bit before reloading the Map to see your changes.
Adding Images
When you are editing your Wiki page, place the text cursor where you want to place an image an push the Insert Picture button:

This opens the Media Manager in a separate window, and by default set it in the Namespace of the parent page instead of the one of the current page (which is not very convenient - we will have to see how it can be improved):

So you need to click on your page name on the left list, or you won't be able to add images. Usually, it is your Property ID (here: “4-1-7”):

Now you can add an image from your disk using the “Select files” button. Don't forget to push the “Upload” button after that! The image will appear below. Click on it to insert it in the page, and a small dialog will appear with all kinds of layout options:

This allows you to control if you want to open the image in a new window, or add a link to it, how to align it with the text, how big it should be, etc. Experiment with the various options and push the Insert button. Congratulations, your code is inserted in the Wiki page (here with the no link option):
{{:en:lakeshoe:4-1-7:general_view.jpg?nolink}}
